Getting Started
Welcome to your new Salcom SR-200 Universal TV Remote. This guide will help you set up and get the most out of your remote control.
What’s in the Box
Your package includes the SR-200 remote control, two AAA batteries, and a quick start card. If any items are missing, contact your retailer.
Installing the Batteries
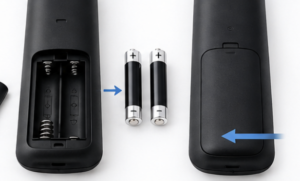
Slide the battery cover off the back of the remote, insert the two AAA batteries matching the polarity markings, and replace the cover until it clicks into place.
Pairing Your Remote
The SR-200 must be paired with your TV before first use. Pairing takes less than two minutes.
Automatic Pairing
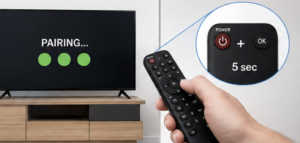
Point the remote at your TV and hold the Power and OK buttons together for five seconds. The LED will flash green three times when pairing is successful.
Manual Pairing with Brand Codes
If automatic pairing fails, enter your TV brand’s four-digit code from the included code list. Hold the Setup button, type the code, and press Power to confirm.
Using Your Remote
Once paired, the SR-200 controls power, volume, channels, and smart TV navigation.
Button Layout
The directional pad in the centre handles menu navigation. Volume controls sit on the left edge, channel controls on the right, and shortcut keys for streaming apps along the bottom row.
Programming Shortcut Keys
Hold any shortcut key for three seconds while on your desired app or channel to save it. A short vibration confirms the shortcut has been stored.
Troubleshooting
Most issues can be resolved with the steps below.
Remote Not Responding
Check the batteries are inserted correctly and have charge. If the LED does not light when pressing buttons, replace the batteries.
TV Not Responding to Commands
Ensure there is a clear line of sight between the remote and the TV sensor, and that you are within eight metres. Re-pair the remote if the issue persists.
Resetting to Factory Defaults
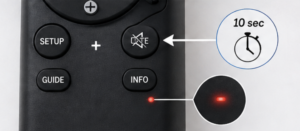
Hold Setup and Mute together for ten seconds until the LED flashes red. This clears all pairings and shortcuts, returning the remote to its out-of-box state.